
VLA-Adapter 代码详解:Bridge Attention 如何把 VLM 表征接到动作空间

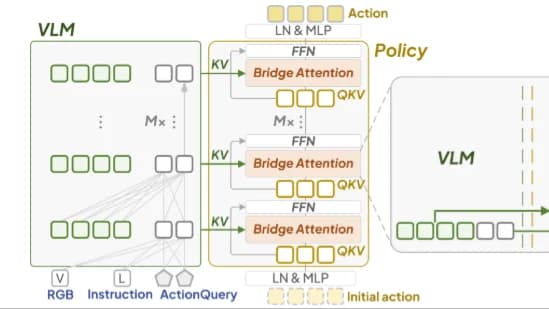
VLA-Adapter 的核心问题可以概括为一句话:如何把 VLM 内部的视觉-语言表征有效转化为动作策略可用的条件。
传统 VLA 很容易写成:
image + instruction -> VLM -> action head -> action
但 VLA-Adapter 认为,这条链路的难点不在于最后加一个动作头,而在于中间的“桥”。VLM 的不同层保存着不同粒度的信息:中层 Raw features 往往保留更多空间和多模态细节,深层 ActionQuery 更擅长汇聚动作相关语义。如果只拿最后一层 hidden state 直接回归动作,很多对控制有用的信息已经被压缩或偏向语言生成目标。
因此,VLA-Adapter 的代码实现围绕三件事展开:
在 VLM 输入序列中插入可学习的
ActionQuery。从 VLM 全层 hidden states 中提取 Raw features 和 ActionQuery features。
在 Policy 中用 Bridge Attention 逐层注入这些条件,最后用 L1 回归输出连续动作。
1. 代码入口:训练脚本如何组织 VLA-Adapter
训练入口位于:
vla-scripts/finetune.py
核心配置集中在 FinetuneConfig:
@dataclass
class FinetuneConfig:
    config_file_path: str = "openvla/openvla-7b"
    vlm_path: str = "openvla/openvla-7b"

    data_root_dir: Path = Path("datasets/rlds")
    dataset_name: str = "aloha_scoop_x_into_bowl"
    run_root_dir: Path = Path("runs")

    use_l1_regression: bool = True
    use_diffusion: bool = False
    use_film: bool = False
    num_images_in_input: int = 1
    use_proprio: bool = False

    batch_size: int = 8
    learning_rate: float = 5e-4
    max_steps: int = 200000

    use_lora: bool = False
    lora_rank: int = 32
    lora_dropout: float = 0.0

    use_pro_version: bool = True
    phase: str = "Training"
这里几个参数决定了 VLA-Adapter 的训练方式:
use_l1_regression=True:使用连续动作回归,而不是离散动作 token 生成。use_proprio=True/False:是否引入机器人本体状态。use_lora=True/False:是否用 LoRA 微调 VLM。use_pro_version=True:是否启用增强版 Policy block。
训练脚本中最关键的函数是 run_forward_pass()。它负责:
调用 VLA backbone 得到全层 hidden states。
从 hidden states 中切出视觉任务 token 和动作查询 token。
将多层条件送入
action_head。用 L1 loss 监督连续动作。
2. VLM 侧:ActionQuery 如何插入序列
VLA-Adapter 的 VLM 主体在:
prismatic/extern/hf/modeling_prismatic.py
在 PrismaticForConditionalGeneration 初始化时,代码加入了可学习的动作查询 token:
self.action_queries = nn.Embedding(NUM_TOKENS, self.llm_dim)
self.action_queries.weight.data.zero_()
这里的 NUM_TOKENS 对应动作查询 token 数量。它不是普通文本 token,而是一组可学习 embedding,用来在 VLM 的注意力层中主动读取视觉和语言上下文。
在 multimodal forward 中,模型先得到文本 embedding:
input_embeddings = self.get_input_embeddings()(input_ids)
然后根据 labels 找到动作 token 位置:
all_actions_mask = self._process_action_masks(labels)
接着用 action_queries 替换原本的动作位置 embedding:
action_queries = self.action_queries.weight
action_queries = action_queries.view(
    1,
    action_queries.shape[0],
    action_queries.shape[1],
).repeat(input_embeddings.shape[0], 1, 1)

input_embeddings = self._replace_input_embeddings(
    input_embeddings,
    all_actions_mask,
    action_queries,
)
这一步非常关键。模型不是让 LLM 自回归生成动作 token,而是在输入序列中预留一段动作查询位置,让这些位置通过 Transformer 注意力从图像和语言上下文中吸收信息。随后这些 ActionQuery 的 hidden states 会被 Policy 读取,用于连续动作回归。
3. 图像 token 如何进入 VLM
同一文件中,视觉 backbone 和 projector 负责把图像转成 LLM 可处理的 patch embeddings。
视觉 backbone 支持单视觉塔和 fused vision backbone:
class PrismaticVisionBackbone(nn.Module):
    def forward(self, pixel_values):
        if self.num_images_in_input == 1:
            if not self.use_fused_vision_backbone:
                return self.featurizer(pixel_values)

            img, img_fused = torch.split(pixel_values, [3, 3], dim=1)
            patches = self.featurizer(img)
            patches_fused = self.fused_featurizer(img_fused)
            return torch.cat([patches, patches_fused], dim=2)
如果使用 fused backbone,代码会把 SigLIP 与 DINOv2 等视觉特征拼接起来。随后通过 PrismaticProjector 投到 LLM hidden size:
class PrismaticProjector(nn.Module):
    def __init__(self, use_fused_vision_backbone, vision_dim, llm_dim):
        if not self.use_fused_vision_backbone:
            self.fc1 = nn.Linear(self.vision_dim, self.llm_dim)
            self.fc2 = nn.Linear(self.llm_dim, self.llm_dim)
            self.act_fn1 = nn.GELU()
        else:
            initial_projection_dim = 4 * vision_dim
            self.fc1 = nn.Linear(self.vision_dim, initial_projection_dim)
            self.fc2 = nn.Linear(initial_projection_dim, self.llm_dim)
            self.fc3 = nn.Linear(self.llm_dim, self.llm_dim)
在 forward 中,视觉特征会被拼进多模态序列:
projected_patch_embeddings = self._process_vision_features(
    pixel_values,
    language_embeddings,
    use_film,
)

multimodal_embeddings, multimodal_attention_mask = self._build_multimodal_attention(
    input_embeddings,
    projected_patch_embeddings,
    attention_mask,
)
最终送入 language model:
language_model_output = self.language_model(
    input_ids=None,
    attention_mask=multimodal_attention_mask,
    inputs_embeds=multimodal_embeddings,
    labels=None,
    output_hidden_states=output_hidden_states,
    return_dict=return_dict,
)
注意这里设置了 output_hidden_states=True。VLA-Adapter 后续不会只取最后一层,而是要使用每一层 hidden states。
4. 训练 forward:如何从全层 hidden states 组装 Policy 输入
回到 vla-scripts/finetune.py。在 run_forward_pass() 中,VLA backbone 前向如下:
output = vla(
    input_ids=batch["input_ids"].to(device_id),
    attention_mask=batch["attention_mask"].to(device_id),
    pixel_values=batch["pixel_values"].to(torch.bfloat16).to(device_id),
    labels=batch["labels"],
    output_hidden_states=True,
    proprio=batch["proprio"] if use_proprio else None,
    proprio_projector=proprio_projector if use_proprio else None,
    use_film=use_film,
)
如果启用 L1 regression,代码会遍历 output.hidden_states 的所有层:
multi_layer_hidden_states = []

for item in output.hidden_states[0:]:
    text_hidden_states = item[:, num_patches:-1]
    batch_size = batch["input_ids"].shape[0]

    actions_hidden_states = text_hidden_states[
        current_action_mask | next_actions_mask
    ].reshape(batch_size, 1, NUM_TOKENS, -1).to(torch.bfloat16)

    task_latten_states = item[:, :num_patches].reshape(
        batch_size,
        1,
        num_patches,
        -1,
    )

    all_hidden_states = torch.cat(
        (task_latten_states, actions_hidden_states),
        2,
    )
    multi_layer_hidden_states.append(all_hidden_states)

multi_layer_hidden_states = torch.cat(multi_layer_hidden_states, dim=1)
这一段是 VLA-Adapter 的信息接口核心。它把每层 hidden state 拆成两类条件:
task_latten_states:视觉 patch 对应的 Raw features。actions_hidden_states:ActionQuery 对应的动作查询 features。
然后在 token 维度拼接:
all_hidden_states = [Raw task features, ActionQuery features]
再在 layer 维度拼接:
multi_layer_hidden_states.shape ~= (B, num_layers, num_task_tokens + NUM_TOKENS, hidden_dim)
这就是 Policy 的输入。它不是一个单层特征,而是 VLM 全层的条件集合。
5. L1RegressionActionHead:Policy 的外壳
动作头定义在:
prismatic/models/action_heads.py
L1RegressionActionHead 的初始化如下:
class L1RegressionActionHead(nn.Module):
    def __init__(
        self,
        input_dim=4096,
        hidden_dim=4096,
        action_dim=7,
        num_task_tokens=512,
        use_pro_version=False,
    ):
        super().__init__()
        self.num_task_tokens = num_task_tokens
        self.action_dim = action_dim
        self.hidden_dim = hidden_dim
        self.model = MLPResNet(
            num_blocks=24,
            input_dim=input_dim * ACTION_DIM,
            hidden_dim=hidden_dim,
            output_dim=action_dim,
            use_pro_version=use_pro_version,
        )
它本质上是一个基于 MLPResNet 的连续动作生成头。num_blocks=24 与 Qwen2.5-0.5B 这类 backbone 的层数对应,使 Policy 可以逐层接收 VLM 条件。
预测动作时:
def predict_action(self, actions_hidden_states, proprio=None, proprio_projector=None, phase="Inference"):
    batch_size = actions_hidden_states.shape[0]
    device = actions_hidden_states.device

    proprio = proprio.reshape(batch_size, -1).to(torch.bfloat16)
    proprio_features = proprio_projector(proprio)
    proprio_features = proprio_features.unsqueeze(dim=1)

    task_hidden_states = actions_hidden_states[:, :, :self.num_task_tokens, :]
    actions_hidden_states = actions_hidden_states[:, :, self.num_task_tokens:, :]
这里再次把输入拆成两部分:
task_hidden_states:Raw features。actions_hidden_states:ActionQuery features。
随后构造动作 latent 的初始状态:
cond_actions_hidden_states = torch.zeros(
    (batch_size, self.action_dim * NUM_ACTIONS_CHUNK, self.hidden_dim),
    device=device,
    dtype=actions_hidden_states.dtype,
).detach()

rearranged_actions_hidden_states = cond_actions_hidden_states.reshape(
    batch_size,
    NUM_ACTIONS_CHUNK,
    -1,
)
如果处于训练阶段,还会加随机扰动:
if phase == "Training":
    random_perturbations = learnable_random_perturbations(
        seq_len,
        dim,
        device=rearranged_actions_hidden_states.device,
        dtype=rearranged_actions_hidden_states.dtype,
    )
    rearranged_actions_hidden_states = rearranged_actions_hidden_states + random_perturbations
最后进入 MLPResNet:
action = self.model(
    rearranged_actions_hidden_states,
    h_a=actions_hidden_states,
    p=proprio_features,
    h_t=task_hidden_states,
)
注意三个条件的含义:
x:Policy 内部动作 latent。h_a:ActionQuery 条件。h_t:Raw task features。p:proprioception 本体状态。
6. MLPResNet:逐层 Bridge Attention
MLPResNet 中的 forward 非常直接:
def forward(self, x, h_a=None, h_t=None, p=None):
    x = self.layer_norm1(x)
    x = self.fc1(x)
    x = self.relu(x)

    for i, block in enumerate(self.mlp_resnet_blocks):
        x = block(
            x,
            h_t=h_t[:, i + 1, :],
            h_a=h_a[:, i + 1, :],
            p=p,
        )

    x = self.layer_norm2(x)
    x = self.fc2(x)
    return x
这里最重要的是 i + 1。Policy 的第 i 个 block 对应读取 VLM 的第 i+1 层条件。也就是说,VLA-Adapter 不是把所有层简单 concat 后一次性喂给动作头,而是在 Policy 的层级演化中逐层接入 VLM 条件。
可以把它理解成:
Policy block 1  <- VLM layer 1 condition
Policy block 2  <- VLM layer 2 condition
...
Policy block N  <- VLM layer N condition
这就是 VLA-Adapter 相比普通 action head 更关键的地方:它让 VL 到 A 的桥接本身也具有层级结构。
7. Bridge Attention 原版:ActionQuery 全注入,Raw features 门控注入
原版 MLPResNetBlock 实现了 Bridge Attention:
class MLPResNetBlock(nn.Module):
    def __init__(self, dim):
        super().__init__()
        self.ffn = nn.Sequential(
            nn.LayerNorm(dim),
            nn.Linear(dim, dim),
            nn.ReLU(),
        )

        self.num_heads = 8
        self.head_dim = dim // self.num_heads
        self.q_proj = nn.Linear(dim, dim)
        self.k_proj = nn.Linear(dim, dim)
        self.v_proj = nn.Linear(dim, dim)
        self.o_proj = nn.Linear(dim, dim)

        self.gating_factor = nn.Parameter(torch.zeros(1))
forward 中先计算门控:
g = self.gating_factor
ratio_g = nn.Tanh()(g)
然后把 ActionQuery 和 proprioception 合并成一类条件:
conditions = []
if h_a is not None:
    conditions.append(h_a)
if p is not None:
    conditions.append(p)

h = torch.cat(conditions, dim=1)
接着构造三类 Key/Value:
task_k = h
task_v = h

adapter_k = h_t
adapter_v = h_t

q_1 = self.q_proj(x)
k_tokens = self.k_proj(x)
v_tokens = self.v_proj(x)
k_task = self.k_proj(task_k)
v_task = self.v_proj(task_v)
k_adapter = self.k_proj(adapter_k)
v_adapter = self.v_proj(adapter_v)
这里命名略容易混淆,但从数据来源看:
x是 Policy 自身 latent,用于 self-attention。h来自ActionQuery + proprio,全量参与注入。h_t来自 Raw task features,通过 gate 控制注入强度。
注意力分数如下:
attn_scores_tokens = torch.matmul(q_1, k_tokens.transpose(-2, -1))
attn_scores_task = torch.matmul(q_1, k_task.transpose(-2, -1)) * 1
attn_scores_adapter = torch.matmul(q_1, k_adapter.transpose(-2, -1)) * ratio_g

attn_scores = torch.cat(
    [attn_scores_tokens, attn_scores_task, attn_scores_adapter],
    dim=-1,
)
这正对应论文中的非对称注入思想:
ActionQuery / proprio: 直接注入
Raw features: 门控注入
为什么 Raw features 要门控?因为 Raw features 中包含大量面向视觉语言建模的信息,并不全都对动作有益。门控从 0 初始化,让模型在训练中逐步学习“该注入多少 Raw 信息”,避免一开始就破坏 Policy 表征。
最后将三类 Value 拼接并做注意力聚合:
v_combined = torch.cat([v_tokens, v_task, v_adapter], dim=2)
output = torch.matmul(attn_weights, v_combined)
output = output.transpose(1, 2).contiguous().view(B, T, C)
output = self.o_proj(output)

x = self.ffn(output + x)
这就是 Bridge Attention 的核心:Policy latent 不是被动接收 VLM 的最后一层特征,而是在每一层通过注意力主动读取 ActionQuery、Raw features 和 proprioception。
8. Pro 版:分离投影与 RoPE
Pro 版使用 MLPResNetBlock_Pro。它与原版的主要差别是:
self-attention、adapter 条件、task 条件使用分离的 K/V 投影。
对 Q/K 加入 RoPE。
保留门控机制。
初始化中可以看到三套 K/V:
self.q_proj = nn.Linear(dim, dim)

self.k_self = nn.Linear(dim, dim)
self.v_self = nn.Linear(dim, dim)

self.k_adapter = nn.Linear(dim, dim)
self.v_adapter = nn.Linear(dim, dim)

self.k_task = nn.Linear(dim, dim)
self.v_task = nn.Linear(dim, dim)

self.gating_factor = nn.Parameter(torch.zeros(1))
self.rope = RotaryPositionEmbedding(self.head_dim)
forward 中,ActionQuery 与 proprio 被拼成 adapter 条件:
h_adapter = torch.cat((h_a, p), dim=1)
h_task = h_t
然后分别计算 self、adapter、task 三路 K/V:
k_tokens = self.k_self(x)
v_tokens = self.v_self(x)

k_adapter = self.k_adapter(h_adapter)
v_adapter = self.v_adapter(h_adapter)

k_task = self.k_task(h_task)
v_task = self.v_task(h_task)
RoPE 被应用到 self、adapter 和 task 的 key 上:
cos_main, sin_main = self.rope(seq_len=T, device=x.device, dtype=x.dtype)
q_1, k_tokens = apply_rope(q_1, k_tokens, cos_main, sin_main)

cos_a, sin_a = self.rope(seq_len=K_a, device=x.device, dtype=x.dtype)
_, k_adapter = apply_rope(k_adapter, k_adapter, cos_a, sin_a)

cos_t, sin_t = self.rope(seq_len=K_t, device=x.device, dtype=x.dtype)
_, k_task = apply_rope(k_task, k_task, cos_t, sin_t)
注意力分数:
attn_scores = [torch.matmul(q_1, k_tokens.transpose(-2, -1))]
attn_scores.append(torch.matmul(q_1, k_adapter.transpose(-2, -1)))
attn_scores.append(torch.matmul(q_1, k_task.transpose(-2, -1)) * ratio_g)
attn_scores = torch.cat(attn_scores, dim=-1) / math.sqrt(self.head_dim)
Pro 版的含义很清楚:不同条件来源不再共用同一套 K/V 投影,而是各自学习更适合自己的注意力表示。对于 self latent、ActionQuery/proprio 和 Raw task features 这三类分布差异较大的输入,分离投影通常更稳定,也更有表达力。
9. Loss:连续动作 L1 回归
VLA-Adapter 默认使用 L1 Policy。训练脚本中,动作预测之后直接计算 L1 loss:
predicted_actions = action_head.module.predict_action(
    multi_layer_hidden_states,
    proprio=batch["proprio"] if use_proprio else None,
    proprio_projector=proprio_projector if use_proprio else None,
    phase=cfg.phase,
)

loss = torch.nn.L1Loss()(predicted_actions, ground_truth_actions)
同时会记录当前动作与未来动作 chunk 的 L1:
ground_truth_curr_action = ground_truth_actions[:, 0]
predicted_curr_action = predicted_actions[:, 0]

ground_truth_next_actions = ground_truth_actions[:, 1:]
predicted_next_actions = predicted_actions[:, 1:]

curr_action_l1_loss = torch.nn.L1Loss()(ground_truth_curr_action, predicted_curr_action)
next_actions_l1_loss = torch.nn.L1Loss()(ground_truth_next_actions, predicted_next_actions)
这与一些扩散式或 flow matching VLA 不同。VLA-Adapter 的目标是轻量和高速,因此选择直接连续回归。它把建模重点放在“怎样把 VLM 条件桥接给 Policy”,而不是把动作生成本身做得很重。
10. 推理路径:占位动作 token -> ActionQuery -> Policy 输出动作
推理时,OpenVLAForActionPrediction 会给输入追加动作占位 token:
placeholder_action_token_ids = (
    torch.ones((input_ids.shape[0], NUM_TOKENS))
    .to(input_ids.device)
    .to(input_ids.dtype)
)
input_ids = torch.cat([input_ids, placeholder_action_token_ids], dim=-1)
再追加 stop token:
stop_token_id = torch.ones((input_ids.shape[0], 1)).to(input_ids.device).to(input_ids.dtype) * STOP_INDEX
input_ids = torch.cat([input_ids, stop_token_id], dim=-1)
这些占位 token 在 forward 中会被真正的 action_queries 替换。随后模型拿到全层 hidden states,并在 _regression_or_discrete_prediction() 中组装 Policy 输入:
for item in language_model_output.hidden_states[0:]:
    text_hidden_states = item
    actions_hidden_states = text_hidden_states[
        :,
        NUM_PATCHES + NUM_PROMPT_TOKENS : NUM_PATCHES + NUM_PROMPT_TOKENS + NUM_TOKENS,
        :,
    ].reshape(1, 1, NUM_TOKENS, -1).to(torch.bfloat16)

    task_latten_states = item[:, :NUM_PATCHES].reshape(
        batch_size,
        1,
        NUM_PATCHES,
        -1,
    )

    all_hidden_states = torch.cat((task_latten_states, actions_hidden_states), 2)
    multi_layer_hidden_states.append(all_hidden_states)
这与训练时的接口保持一致:仍然是全层 Raw features + ActionQuery features。最后由 action head 输出连续动作,并根据数据集统计反归一化。
11. 从代码看 VLA-Adapter 的设计取舍
VLA-Adapter 的代码有几个非常明确的取舍。
第一,动作空间采用连续回归,而不是动作 token 自回归。这降低了推理延迟,也避免了离散化带来的精度损失。
第二,VLM 不只提供最后一层 hidden state,而是提供全层条件。代码中 for item in output.hidden_states[0:] 是整个方法成立的关键之一。
第三,ActionQuery 被设计成可学习 token,插在动作位置中。它不是输出 token,而是用于从 VLM 内部收集动作相关信息的查询载体。
第四,Bridge Attention 的条件注入是非对称的。ActionQuery/proprio 可以直接进入 Policy,而 Raw features 通过可学习 gate 控制强度。这一设计对应论文中的经验发现:Raw features 有价值,但需要谨慎注入。
第五,Pro 版通过分离投影和 RoPE 改善了不同条件通道之间的表达冲突。它没有改变总体范式,但使工程实现更适合高性能训练。
总结
VLA-Adapter 的代码实现并不只是“给 VLM 加一个 Adapter”。更准确地说,它重新定义了 VLM 到 Policy 的接口:
VLM 全层 Raw features
        +
可学习 ActionQuery features
        +
proprioception features
        -> Bridge Attention
        -> L1 Policy
        -> continuous action chunk
这套接口的价值在于,它让小型 VLM 内部已有的视觉语言知识能够以更高带宽、更细粒度的方式进入动作空间。最终,一个 0.5B 级 backbone 不必依赖庞大的机器人预训练,也能通过高效桥接获得强动作策略。
从工程角度看,VLA-Adapter 最值得借鉴的不是某个单独模块,而是这种系统性的接口设计:先分析信息在哪一层、以什么形式存在,再设计 Policy 如何逐层读取、门控和融合这些信息。对于后续小型 VLA、低成本机器人微调和真实部署,这个思路比单纯扩大 backbone 更有实际意义。
问下,第七点,如果把门控去掉,直接使用 Raw features,模型效果会变差很多吗? 这个门控的意义…
@limxz 去掉肯定会变差,这个''gate''的核心作用是控制raw features的注入强度,如果直接去掉gate,相当于它一开始就会和actionquery一起抢attention,训练会没那么稳定